Wednesday, December 31, 2008

Kristina's Color Challenge...Finally!!

Well I have been wanting to participate in Kristina's color challenge since she started them. If you haven't been to her blog, she posts a color challenge every week. You can check out her blog here http://kwernerdesign.com/blog/. Finally, I had some time to produce something that appealed to me and was really quick and easy! I didn't want to create a card. It had to be either a scrapbook page or some 3-D type item. This is what I came up with. The patterned paper incorporates almost all the colors in the challenge except for old olive. I had to add some old olive ribbon but it just looked to out there by itself so I added the pretty in pink ribbon with it. For those who relish the time they have to stamp, there is no stamping involved in this project but I'm sure if you use this as inspiration you can incorporate some stamping somewhere (smile). Feel free to leave a comment and thanks for looking!

Valentine's Day Bags and a Giveaway

Hi Everyone,

I made so many gifts for Christmas that I can't seem to stop! Since Christmas is over, I thought I would get a head start on Valentine's day! Yes I know we have over a month until the big day but I'm on a roll right now and I don't want to lose momentum! So here is what I'm proposing, I know that I'm going to go overboard with gift making (seeing as I'm in the mood to create!). If you subscribe to my blog, you will be entered into a drawing for these gift bags. I know gasp...how do you subscribe you ask? Well type your e-mail in the box to the right that says subscribe. Those who have already subscribed, well your in the drawing already! I may throw in a little extra treat so no time to waste, get those fingers typing! :)

Friday, November 28, 2008

One More

Hi Everyone,
Here is one more project I wanted to post. I've also had some white paper bags floating around my craft table and didn't know what to do with them. I know Christmas is coming and I thought it would be really cute to make some type of decorated bag that I could put some treats in. The holly is made with the oval punch (I got this I idea from attending my friend, Tiffany's, stamp a stack). She used the oval punch to make flower petals for a card (I think she may have gotten the idea from Alicia). Anyway, I just expanded on the idea and used the small circle punch for the berries. I used the scalloped edge punch for the top of the bag. Let me know what you think. :)

Santa Bag

I don't know where I saw it, I think it was on someone's blog. She used a red bag and added a black strip for the belt and another color for the buckle. I thought I could improve on the same look and I had a bunch of white bags that have just been sitting in one of my craft drawers! So here is my take on the bag. For those of you who really love this, I will be offering a class, another $5 one, to make this bag with a card. Details to follow soon!

One More Card

This card I absolutely love for two reason. I love the look of the poinsetta and I love the font used for Christ is Born. I knew I had to order the set! I think it is really a beautiful stamp set. So here you go. I welcome any comments! By the way I don't know if I spelled poinsetta correctly but I tried.

Chirstmas Card

No, I'm still not done. Here is a card I made that was inspired by http://dawnsstampingthoughts.typepad.com/. I actually made the same type of card using the filagree brads but later made a mistake in thinking I had enough of them. Not!! I had to change the card at the last minute and used pearls instead and changed the colors a bit. I still love the card though!

Another Card

Okay,
here is another card that I came up with for my stamp a stack of Christmas cards. The snowman is also from the same set; Shellabrate the Season. As soon as I saw the snowman, I knew what I was going to do with the card. Let me know what you think :)

Lots of Posts

Hi All,
I have been going through computer withdrawals, printer withdrawals and everything else you could imagine that involves any electronic device. My computer just got fixed and my printer decided it liked the idea of a fixed computer so here I am blogging today and posting a lot of projects that I've made. The first photos will be of cards that I made my stamp a stack of Christmas Cards class, which was just a couple of weeks ago. This card was made with the Shellabrate the Season set. I love the tree made out of shells, especially because I live in California. I don't know if you can tell, but I have snowflakes embossed on the background. I used markers to color in the image. Enjoy!!

Sunday, October 19, 2008

Christmas Wreath

Hi Everyone,
I realize it has been a long time since I have posted to my blog. Know this...I have been working feverishly, stamping my little heart out to put projects on my blog. There is more to come soon, but for now, I wanted to share the wreath that I made for Christmas. I'm also going to offer it as a class for my stampers. As soon as I saw the felt flurries I knew immediately that I wanted to do this project. The ribbon is also from the mini catalog too! I did use spray on glitter but it isn't very noticeable in the photo. This project is really easy to do, you just need a hot glue gun, felt flurries, ribbon, and 5mm pearls (which I got at Michaels). The photo at the top is one of the whole wreath and the one at the bottom is a close up. Leave a comment and let me know what you think.

Sunday, July 6, 2008

One more peak!

Hi Everyone,

It has taken me a while to post, sorry about that. Most of you know that I had a big scrapbooking event last weekend. It is an annual event that I hold once year. We did 10 12x12 double page layouts. I think I'm scrapped out for a while! Just kidding, not really!! I won't be posting all the layouts. I gave you a sneak peak last time and this is the only other one I will be posting because it seemed to be the favorite. All supplies are Stampin Up. I used chocolate chip, so saffron, old olive, pumpkin pie and ruby red card stock. If you haven't tried stamping with white craft ink on chocolate chip cardstock you must give it a try! I love the look! The photo is not the best quality, sorry about that, but once I was done, I wanted to do several layouts in chocolate chip! Thankfully I held back, I think my girls who attended probably appreciate not doing all chocolate chip layouts too! Anyway, enjoy!

Thursday, June 5, 2008

Sneak Peak

Finally! I'm back to blogging! Woohoo! This last school term just about killed me! Anyway I wanted to offer you a sneak peak at one of the layouts for my upcoming Third Annual Scrapbook Event. I sat at my craft table and went for it. I really love how the puzzle pieces turned out. Yep...I made them myself from tempting turquoise card stock! I was quite pleased. If you look at the way I positioned the Garden Green pieces, I place them this way so that X would be on this page and and O would be on the other page. I was going to add some ribbon (you know me, the ribbon queen!) but I decided against it. I think the layout turned out pretty well considering I had a picture in my head and wasn't sure if it would turn out the same.
Don't you just hate that? You come up with what you think is this brilliant idea and then when you put it all together it looks terrible! But seriously...let me know what you think!

Tuesday, May 27, 2008

Out of Touch

Sorry I haven't been in touch lately! I have been sooooooo busy!!! Graduation was on the 18th and I was in the middle of 4 classes. Let me tell you, taking 4 eight week classes all at once is nothing to laugh at. It took every part of energy I could muster, not to mention trying to keep up with my Stampin Up business and working 2 jobs. This is the last week! Thank goodness!! I hope to be posting some scrapbook layouts for you all soon!! Can't wait, in the meantime, patience!

Friday, April 11, 2008

Blayne's Mini Book

Just a quick note. I wanted to share this book i made for Blayne. It took one sitting to complete and it is the first time I've actually put something together just for him. It is made with coasters and tied together with ribbon! What do you think? I know what I think! I love it! Anyway I just wanted to share and please leave a comment and let me know what you think!

Thursday, April 10, 2008

Stamp Club Project

This project is somewhat similar to the one that is in the SU catalog. If you take a look on page 93, and compare my vase of flowers you'll notice some changes. They also used different colors. Anyway, this is the project we made tonight for stamp club. I have had these girls in my stamp club for six months. Tonight was their last meeting and I wanted to do something special for them and guess what? They all decided to continue on with the club for another six months. Thanks Paula, Heather, Emily, Erinne, Jasmine and Diane! I have one other stamp club and they meet in two weeks. They have been with me for about two years and I think that it is about time that I made something really special for them as well. I appreciate you girls; Tina, Diana, Sue, Paula, Cindy and Sandy. Tina, Diana, and Paula have been with me from the very beginning! I consider each and every one of you friends! This project uses the Ginormous stamp set. I had only looked at the project a couple of times and it had been a while since I had paid any attention to it. When I started on this project, I went to Michael's to see if I could find glass vases I liked; so it was quite a coincidence when I brought these vases home and turned to the project in the catalog and discovered they were the same vase! I guess I may have known unconsciously! This is a very easy project to make, so if you have time, try it! I'm going to take mine to work and put it on my desk, they also make great Mother's day gifts!

Wednesday, March 19, 2008

Another Clothespin

I think these are so cute! I joined a secret sister swap for Easter and I'm about to send this clothespin out to my secret sister! They are really so great for posting a photo for all to see! The ha ha ha is chipboard. The patterned paper is something I picked up from Michael's. If you haven't signed up for my clip art class, you may want to consider trying it out! We are going to be making this adorable clothespin (not the same style), and an altered binder clip along with an altered clip board! Also, there is a link below and to the right, if you subscribe, you'll receive updates to my blog via e-mail. Thanks for taking a peek and please leave a comment or two!

One More Card

I was on an easy streak last week. This is another card that my stamp club made. By the way, the reason I was on easy streak was not because I wanted to get rid of the girls so quickly, well that was part of it...I was trying to finish catching up on some desperately needed sleep, not to mention assignments for school. Yes I used another Sale-A-Bration set, Birthday Whimsy. The dots are from the Polka Dot Background stamp and the patterned paper is from Stampin Up's Cutie Pie paper. Enjoy!

Stamp Club Project

Here is a card that my stamp club made last week. I love the Ginger Blossom papers from Stampin Up! This card is really easy to make and took us no time at all. The happy birthday stamp is from the So Many Scallops Sale-A-Brations set. If you happen to need a quick project, this may be the one for you!

Wednesday, March 12, 2008

Another Stamp Camp Project

This is the second project I'll be offering for my stamp camp. It is an altered binder clip....yes it will hold a photo. Granted the clip doesn't match the photo, but I had to use something and this was the only photo I had on hand. This idea comes from a fellow demonstrator...thanks Cheryl. I had seen the idea before, but I never really cared for it when I saw photos. I then had the opportunity to make one! It was love at first sight from that point! Very cute project! Stay tuned!

Sunday, March 9, 2008

Jumbo Clothespin

Finally!!!! Sorry it took so long for me to post again. I made this jumbo clothespin and when I went to take a picture, my batteries had died. I just bought some new ones today! Just a little tip; if you have a digital camera and go through batteries like crazy (which is what I was going through) you should try the Lithium batteries by Energizer. They work like a dream. They last 7 times longer than normal batteries, they really are amazing! Now, about this project, I painted the clothespin with blush color paint. I then used a coat of Mod Podge to adhere the patterned paper and then put on another coat to give it a nice sheen. I dragged out my die cut machine and cut the letters from cork and did the same for the card stock to cover the letters. I used Crystal Effects (Stampin Up) to adhere the letters. Once everything was dry I tied the ribbon and voila...an altered clothespin. Joe is my son's name, I've been using it to display his picture! Another tip, if you decide to take on a project like this, it is more convenient to take the clothespin apart before you start. For those of you who don't have a clue, I'll be offering a class soon, to make this project. On another note, I just finished reading a really good book a few days ago. If you have ever seen the movie, The Count of Monte Cristo and loved it, well then you'll love this book! It is called Exact Revenge by Tim Green. It is a couple of years old (2005), but I needed something to read and came across this book. It was a great read. If you haven't seen the movie, The Count of Monte Cristo, you should watch that too! Now that I have enough batteries to last me a while, I'll continue to post more soon! As my sons would say...Peace!

Tuesday, February 19, 2008

A Gift for Diane

This is a gift for my friend Diane. She is in my bible talk group and just a few weeks ago, her son was in a really bad car accident. All of the women in my bible talk tried to think of something we could do to encourage her. Everyone wrote an encouraging scripture on a note card or sheet of paper, even post its and this is what I came up with. It is a block that I made into a collage of all the scriptures, I added some ribbon (if you know me, you know I have to add ribbon to everything I do!) and some rub ons to make it complete. The block was purchased at Michaels. It is very light weight in case you are wondering. I used Mod Podge to adhere the patterned paper and all the notes of scripture. I also rubbed along the edges of most of the pieces of paper with a stamp pad. Initially, I was going to decorate a box with patterned paper as well as paint and then just store everything inside but I didn't like the way it turned out! So then I tried this idea and since a few of my co-workers were exclaiming over how much they liked it, I thought it might be a hit with Diane. It can act as a decorative piece in her house (so if I go over, I hope it isn't hidden somewhere! hint, hint :)), and as a reminder that she has friends that are there for her. On top of the block I put the title "Your rainbow on a rainy day" because that is what we are as friends! I was racking my brain trying to come up with something for the title. It wasn't until I started reading all the scriptures that I came up with one, thank you God for the inspiration! Anyway I hope you enjoy taking a peak and let me know what you think! Also stay tuned...I'm working on my next project and I think it is going to be a real winner, at least I'm hoping it will be! I also have to clean my craft space...ugh!!

Monday, February 11, 2008

Are You Ready for Some Football Layout

Hi all! Here is a layout I started working on today. It is for my next stamp club meeting. I have to make two different ones considering everyone is not interested in football. I used the letter L from the Big Deal Alphabet to make the whole football field. It wasn't easy and it probably would have come out straighter if I had used a stamp a majig but I didn't have the patience this time for that. I did use the big deal alphabet for the letters. For the numbers on the field I used Brushstroke Numbers (they are retired) but I had to resort to what I had on hand. I don't usually buy number sets, if your so inclined to C.A.S.E. my layout, you may have a more current set of numbers that will work well with this layout. The Sporting stamp set and Just Football set are from the current catalog. Let me know what you think!

Friday, February 1, 2008

My Swaps

This card was made for a swap I'm participating in. I used the embrace life stamp set from Stampin Up. The cardstock is Rose Red, Really Rust and Pretty in Pink. I have a tendency in using the earth elements colors a lot. When I first started with Stampin Up I'd use a lot of there bold brights, but now I find I don't use those colors as much anymore! I hardly ever dared to use Rich Regals, but now I use those more than I do the Bold Brights. For those of you who don't have a clue about what I'm talking about, well Stampin Up had four color familes; Bold Brights, Earth Elements, Rich Regals and Soft Subtles. I'd have to say that Earth
Elements are my favorite! This next card was also made for a swap using the One of a Kind stamp set. I think this is my new favorite set! I did not cut all the little flowers by hand! I used the Boho Blossoms Punch that coordinates with the set. Again all the colors used are from the Earth Elements family. Even though I used the punch to cut out the flowers, this card took a while to make because all the flowers are placed on dimensionals! I had to make 5 of each card, not a lot for a swap but it was enough. Post a comment and let me know what you think!

Birthday Present

This little purse is called a dual pocket purse. I just love the idea and I decided to make one for a friend (Bev). Her birthday is today, I won't tell her age because I want to live to see another day. Anyway, the purse has two pockets that can fit 4x4 note cards. Can you believe all you need is one 12x12 sheet of patterned paper to make this purse? Break out that patterned paper! It also stands on it's own once you are done. All supplies are Stampin Up. Below the purse photo are the cards I actually made to go inside the pockets. Aren't they the cutest? I made six cards but you
could probably fit 8 cards comfortably. Or even if your limited on cardstock, you can make 4 cards I think anyone will ooh and aah over this gift. Give it a try!

Sunday, January 20, 2008

Text Break Up

Before you start viewing the photo's below, I want to apologize for the break in text. I previewed everything before I posted and it looked fine but the when I acutally posted something happened. So you'll read for a bit and then have some blank space, please scroll down to get to the rest of the text.

Whole Lotta Layouts Going On...

Whew, it took a while to upload all these pictures. Incidentally, I thought I would have even more pictures to upload. Turns out I have all these layouts but a lot of them are using retired stamp sets. So I decided not to upload those. Anyway...I'm done with what I have. The layout to the left is a single page layout using the Priceless set. I made this for a stamp club meeting. I try to keep my style simple but I do love to cut out images and this just happened to be one of those occasions a form of torture...or so my stamp club girls say :). This next layout is one that my stamp club made in November in anticipation of Christmas. I used the Jumbo Outline Alphabet for the letters...yes... one more form of torture. Because my stamp club members say so. Anyway... they really don't mind, they just give me a hard time! The Christmas stamp set is Wondrous Gift. I love this set! Don't you? Once a year for the last two years I have held one big scrapbooking event. I mean this sucker is a lot of work! It is a stamp camp that I hold in July. It is an all day event and we have so much fun! This layout is from last year's scrap camp. If you can't read the lettering very well it says You Are Loved. Even though you can't see it very well, every mat on this layout is stamped with a background stamp or a wheel is used. Believe it or not, I had some help from a friend (thanks Susan) pre-cutting all the hearts for everyone that came. Otherwise we would have been there all night! 
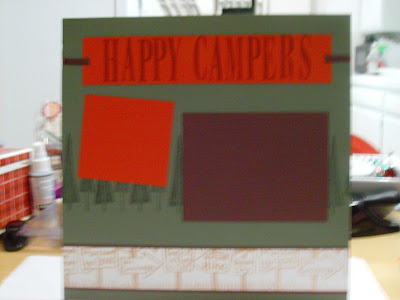
This layout, Happy Campers, is also a product of my scrap camp. I try to include some that are easy enough to do and others are not for the faint of heart. I think that this year instead of holding my scrap camp in July, I may hold it one month earlier... it's something to think about anyway. My You Rock layout, although quite simple, is one of my favorites. I have two boys that love to play Guitar Hero, not to mention myself and I wanted to make something that looked a bit more masculine. I do lean toward frilly layouts, isn't that ironic considering I have no girls? The You Rock letters are embossed with white embossing powder. That is the only stamping done on the layout but I went for the really simple look. What do you think? I haven't shared this with my stamp club ladies, it is just a layout I made for myself. Gotta do that once in a while. Yep... you guessed it! The Boo layout was also another stamp club project. My theory is that you don't need to stamp much as long as you have ribbon! I love...love...love ribbon. I used the Year After Year set for the pumpkins. Now if only I could get my teenagers to a pumpkin patch to take some pictures! Not happening!
Alright, I know I'm a Stampin Up demo but even I fall victim to using non-Stampin Up items. This being done so with this card and the next three cards after this. Does anyone remember what a Sizzix die cut machine is? I had mine buried in a closet for the last two or three years. Since felt happens to be the new cool thing to use I wanted to incorporate it onto my cards and layouts. Hmmm.... How could I do this I asked myself? A few days ago I opened the hall closet and there in all it's glory was my die cut machine, sitting there as unused as the day I bought it, well maybe I did use it once or twice. I hadn't bought very many die cuts for it so my natural inclination was to run down to Michael's to see what I could find. Low and behold I found a die cut that cuts three different flowers that can be used seperately or layered on top of each other. So I went die cut crazy. I was in a frenzy when I got home and started using the machine like I had never used it before. I cut so many felt flowers that I had to put them in a separate container. After I had finished cutting up all my felt it was my natural inclination to use what I had of course so these are cards I came up with. The ribbon is also non-Stampin Up ribbon but I couldn't resist! I used the Celebrate Everything stamp set. So if you have a die cutter that has been collecting dust... by all means bring it into the light of day and use it! Let me know what you think by leaving a comment, I'd love to hear your thoughts! If you can't really read the title that well it says A Father's love... Priceless. This is a layout from my first annual scrap camp. I struggle trying to come up with pages that are more masculine looking, to the disappointment of my boys, they don't want their pictures on flowery layouts all the time! So I used the Loads of Love stamp set.
This was a stamp club project. Yes it is a flowery layout but don't you just love the colors? I used Only Orange with Blush Blossom cardstock for the photo mats. Oh yeah... did I forget to tell you I love ribbon! Just thought I'd mention it again, just in case you forgot. I started to take the pictures of the double page layouts side by side but found it a bit easier to do it this way. I took the words for the title, from a song: These are the moments, I thank God that I'm alive, These are the moments, I'll remember all my life. I found all I've waited for and I could not ask for more. I don't exactly know what the song title is or the name of the singer, but I love the song! If I get stuck for titles for a layout, I'll listen to the radio and come up with something that way. In this case I thought the song was appropriate for a scrapbook page.

Saturday, January 19, 2008

A Valentine for my Sister

I have been trying to get my sister to stamp for the longest time. I went over to her house today and since she didn't have to work I convinced her to come over. Normally when she comes over she's looking for cards I have already made that she can use (anyone have a relative like that?). So today I told her she was going to stamp her own card. She wanted a couple of Valentine cards. This is the design I came up with. I had her stamp the hearts even though I had to cut them out and she rolled the jumbo wheel on the red background. Needless to say she was happy with the outcome! If anyone has been staying tuned, I said I would post most of my scrapbook layouts today. Well as you can see, I didn't get around to it today so, tomorrow is another day. I'm going to have at least half of them up tomorrow. Stay tuned!